December 29, 2014

Making a Star Burst Shirt

For Christmas this year I wanted to make everyone a shirt with our names on it. On the front I put everyone's first name and on the back I did our last name. I called this a star burst shirt because, to me, it looks like a star burst around our names.

The first thing I did was cut the names out of contact paper using my Cricut. I have done this before by cutting the word out of freezer paper and ironing it on but using contact paper was faster and worked just as good


After peeling the backing off I stuck it on the shirt where I wanted it.

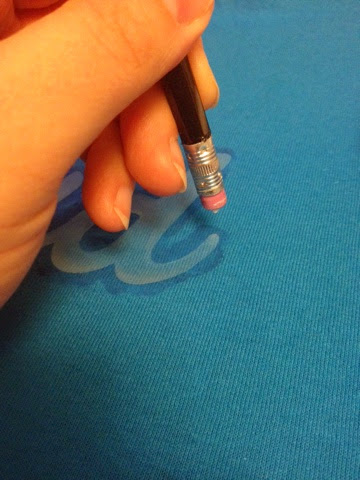
This next step helped seal the edges and stopped the paint from bleeding under the contact paper. On my previous project I did it on white t-shirts so I just used white fabric paint but with these blue shirts I needed something either the same color as the shirt or something clear. I decided to try glue. I used Elmer's Glue All. I poured some into a little dish that I had and with a pencil I dipped it in the glue and went around all the edges (update: After using Elmer's Glue All I found that some of the paint, especially smaller area, such as the middle of a letter, have started coming off after washing. Next time I will be trying fabric glue)


I wanted to make sure the edges were completely covered.

Here you can see it covered in the glue. I made sure to get inside of the a d also.

Once the glue was dry I went on to the next step.

You need at least two different colors of fabric paint. I chose a slick white and a metallic silver fabric paints.

The metallic paint is a little thinner consistency and I found that it lets some of the white show through so it worked great to start with the white paint. Using the same technique as with the glue I use the eraser side of the pencil and dipped it into the paint and started dabbing it around the edge of my last name. 


Here is a short video clip on how to dot with the paint. Sorry for the loud humming noise. I had my little space heater on warming up my feet. 

From time to time the paint built up around the edge of the eraser and I needed to wipe it off to continue to get clean edged dots. Other wise it made sort of a splattered dot.

Once I completely cover the edges of my name I filled in all around working my way out in a star burst pattern. I filled in any spaces using a lot of dots around the name then spacing them out as I went further out. Remember you will be adding in a second color so you will want to leave space for that.

When my first color finished drying I filled in with my second color. I did same thing as I did for the first by going over around the edges of the name going right on top of the first color and then spacing them out as I got further out from the name.

Once that dried I peeled away the contact paper and my name came out crisp and clean.

You can use this technique with all kinds of things. Names, shapes, sports logos.... you are only limited by you imagination. If you have any questions or need me to clarify anything please let me know. 

August 7, 2013

Do you have a lot of pictures sitting on your phone?

I have always been bad about remembering to take pictures. Sadly there are not many pictures of my oldest kids growing up because I never remembered to grab the camera. If you were like me I know you understand.

In this day and time of wonderful technology no one (even me) has that excuse anymore. My cell phone probably has a better camera than my actual camera does. The problem now is I have all these pictures just sitting on my phone.

Well I think I found a service that will help me get those pictures off of my phone and have them where we all can look through them.

There is an app called GrooveBook. You can download it from the apple store and from the android market. Each month you upload 100 pictures from your phone and they send them to you in a pretty little book like this


The pictures are perforated so that you can easily remove them and the quality is very good. 


The most exciting thing about this is the price. The service is just $2.99 a month. That's it. 100 pictures for just $2.99!!! That includes shipping. 

Here is a little video explaining how it works.


Want to try your first GrooveBook for free? Go to www.groovebook.com and download the app. Follow the signup instructions and enter promo code WARD117 at checkout. Once you upload your pictures you will have them in the mail in about 7 - 10 days. Try it out. See how you like it. If you are not as impressed as I am then you can cancel anytime with no obligations.


Thanks for reading
Kelly


July 14, 2013

how to follow my blog....

Since Google reader is now gone I had to find a new way to follow all the blogs that I love. There are several options out there but my favorite has been Bloglovin. So if you were following my blog make sure it is added to whatever site you are using now. If you want to/are using Bloglovin you can clink on the link below and it will add it for you. Thanks for hanging with me :)

Kelly

Follow my blog with Bloglovin

February 6, 2013

Custom Created Quilled Letter Giveaway

I hope to get back to blogging frequently but I wanted to take a min. and let you know that I finally have created a facebook page for my quilled letters. I am almost have 100 likes and I am having a giveaway for an 8x10 letter when I do reach 100 likes ($20 retail value). So go on over and check out my page and share with your friends. www.facebook.com/allthingsmadebykelly. In the photo section you can see samples of what I have done for previous customers, some that I have pre-made and ready to ship out to you, and you can also see all the colors you have to chose from. Here are some examples of what you can win.

Update: Well that went way quicker than I thought it would. We have already reached 100 likes and a winner was chosen. But don't worry. I plan on doing another giveaway when we get to 200 likes so go ahead and get your like in soon or you might miss it.